
8 Tips For Staying Safe And Secure On Twitter
Nabamita Sinha, 3 weeks ago
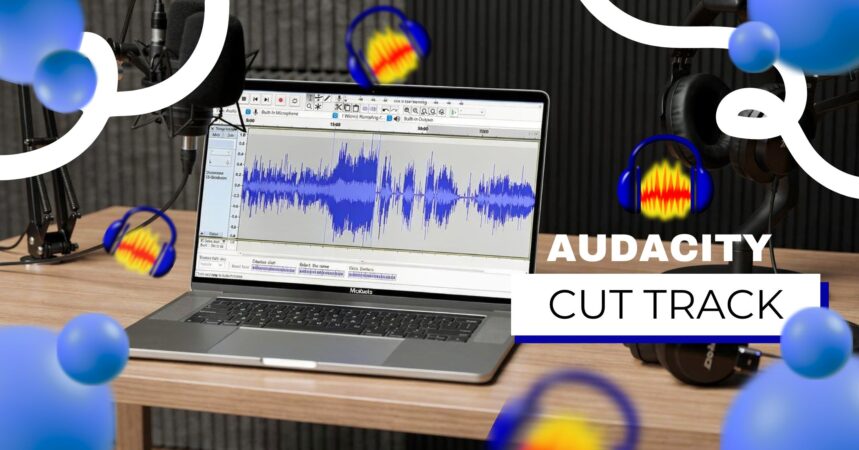
The audio editing software Audacity has become a reliable and widely utilized tool that people use to create audio recordings.
The software provides free access to its open-source capabilities, which enable users to create various audio projects ranging from amateur podcasts to professional voiceovers, interviews, audiobooks, and educational recordings.
The core audio project requires one fundamental task, which stands as the essential requirement for all audio projects.
Users need to learn how to cut tracks in Audacity because track cutting involves more than deleting track sections.
The process helps users to develop content that creates better content flow while removing content that disturbs the listening experience, and they create a finished product that maintains professional sound quality.
The guide provides comprehensive instructions that teach users how to cut, trim, and split audio tracks in Audacity.
Audacity provides free digital audio editing software that works on Windows, macOS, and Linux operating systems. The software becomes popular because of three main features that users experience.
Audacity is commonly used for:
Independent creators, educators, and new podcasters choose to use Audacity as their primary software despite premium digital audio workstations such as Adobe Audition and Pro Tools becoming the standard in professional studios.
The user needs to learn about Audacity’s audio data management before learning how to cut tracks in the program.
Audacity uses non-linear editing, meaning:
This allows you to experiment freely while learning. However, once you export and close the project, edits become permanent, making proper workflow essential.
Also Check: Adobe Podcast AI Tools Review 2026
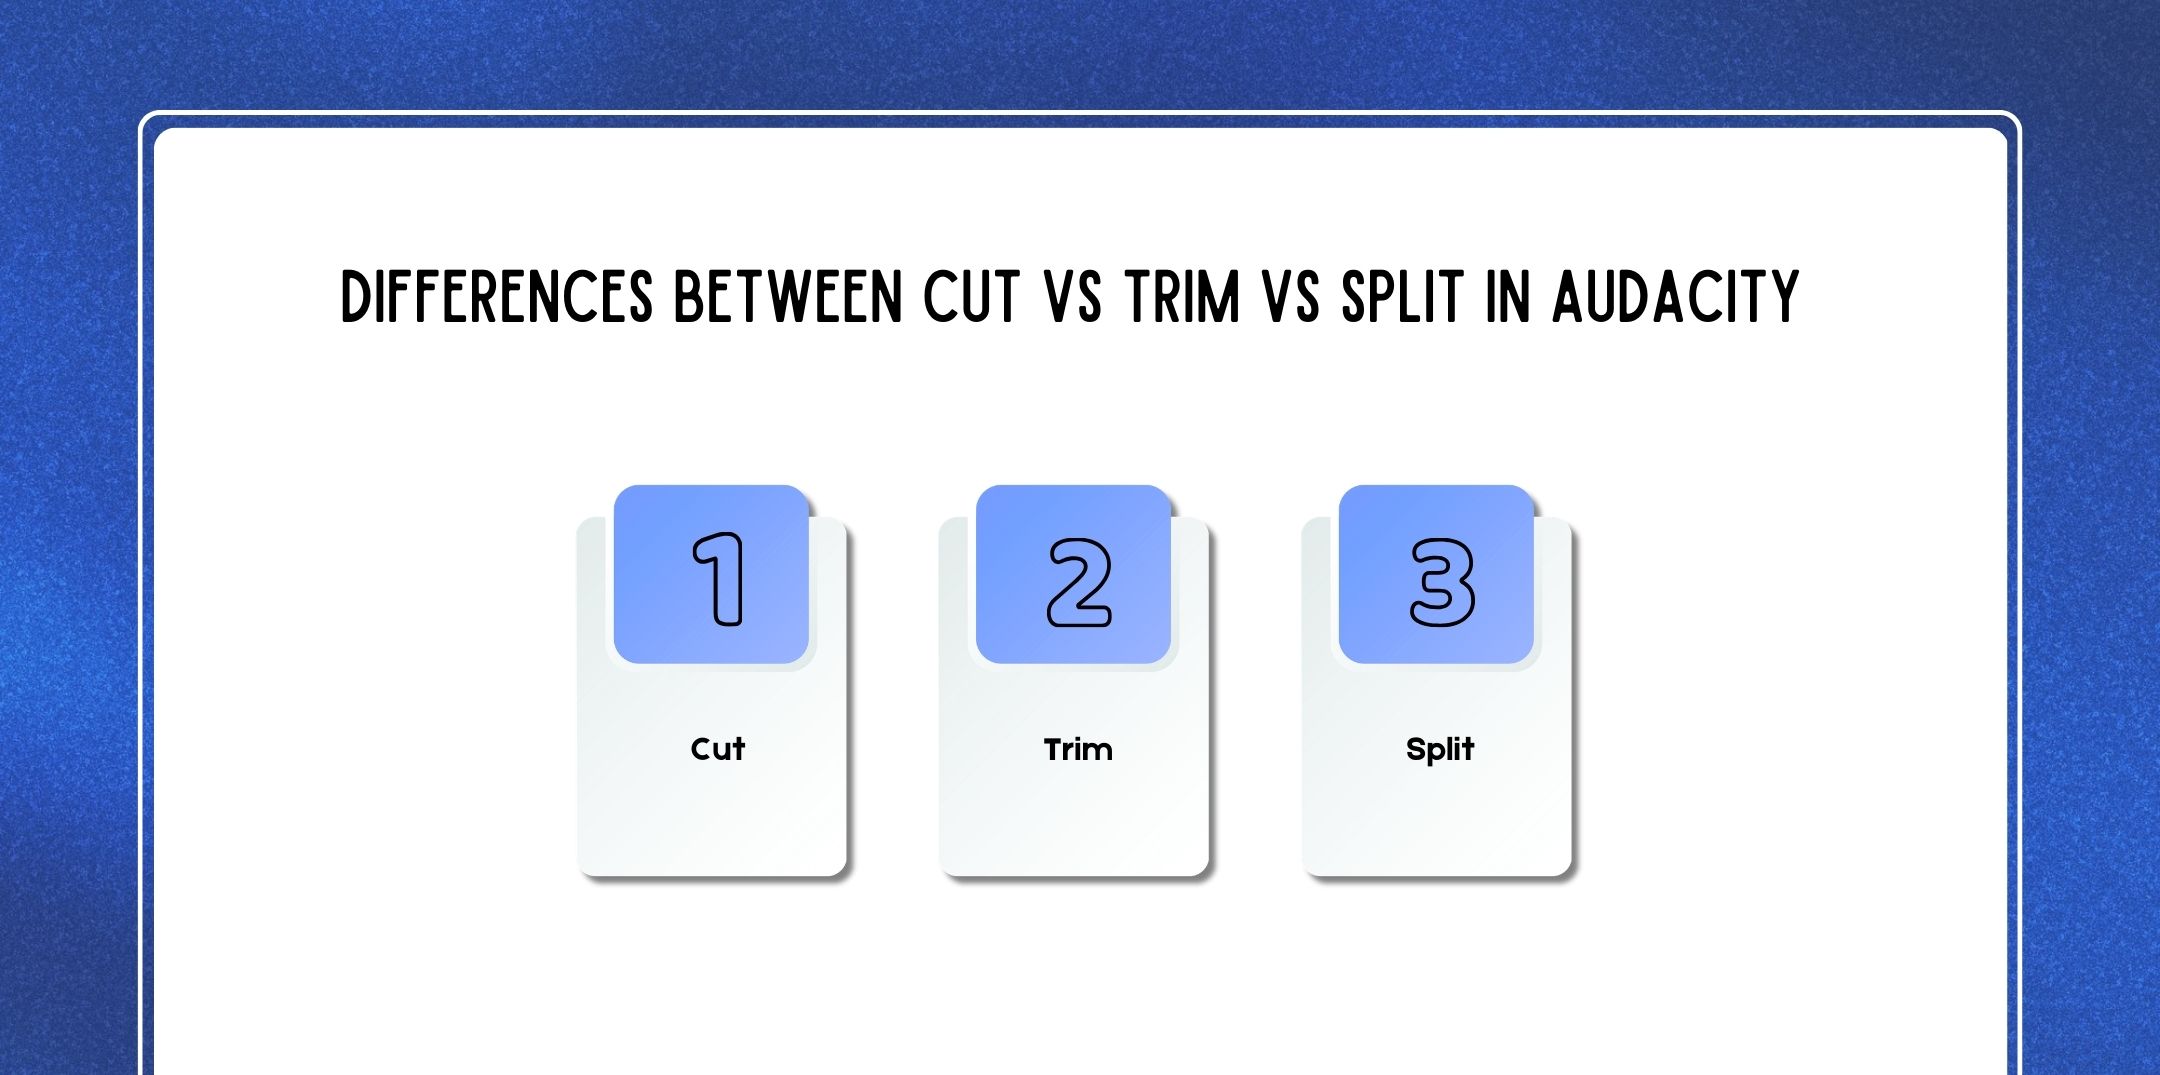
Understanding these three actions is critical. Many beginners accidentally delete audio they meant to keep simply because they don’t know which tool to use.
Cut removes the selected portion of audio and automatically closes the gap.
Best used for:
Cut is the most commonly used editing action when learning how to cut and trim audio in Audacity.
Trim deletes everything except the selected portion.
Best used for:
Trim is destructive in appearance but still undoable within the session.
Split separates audio into clips without removing anything.
Best used for:
Splitting is essential when learning how to move audio in Audacity without losing content.
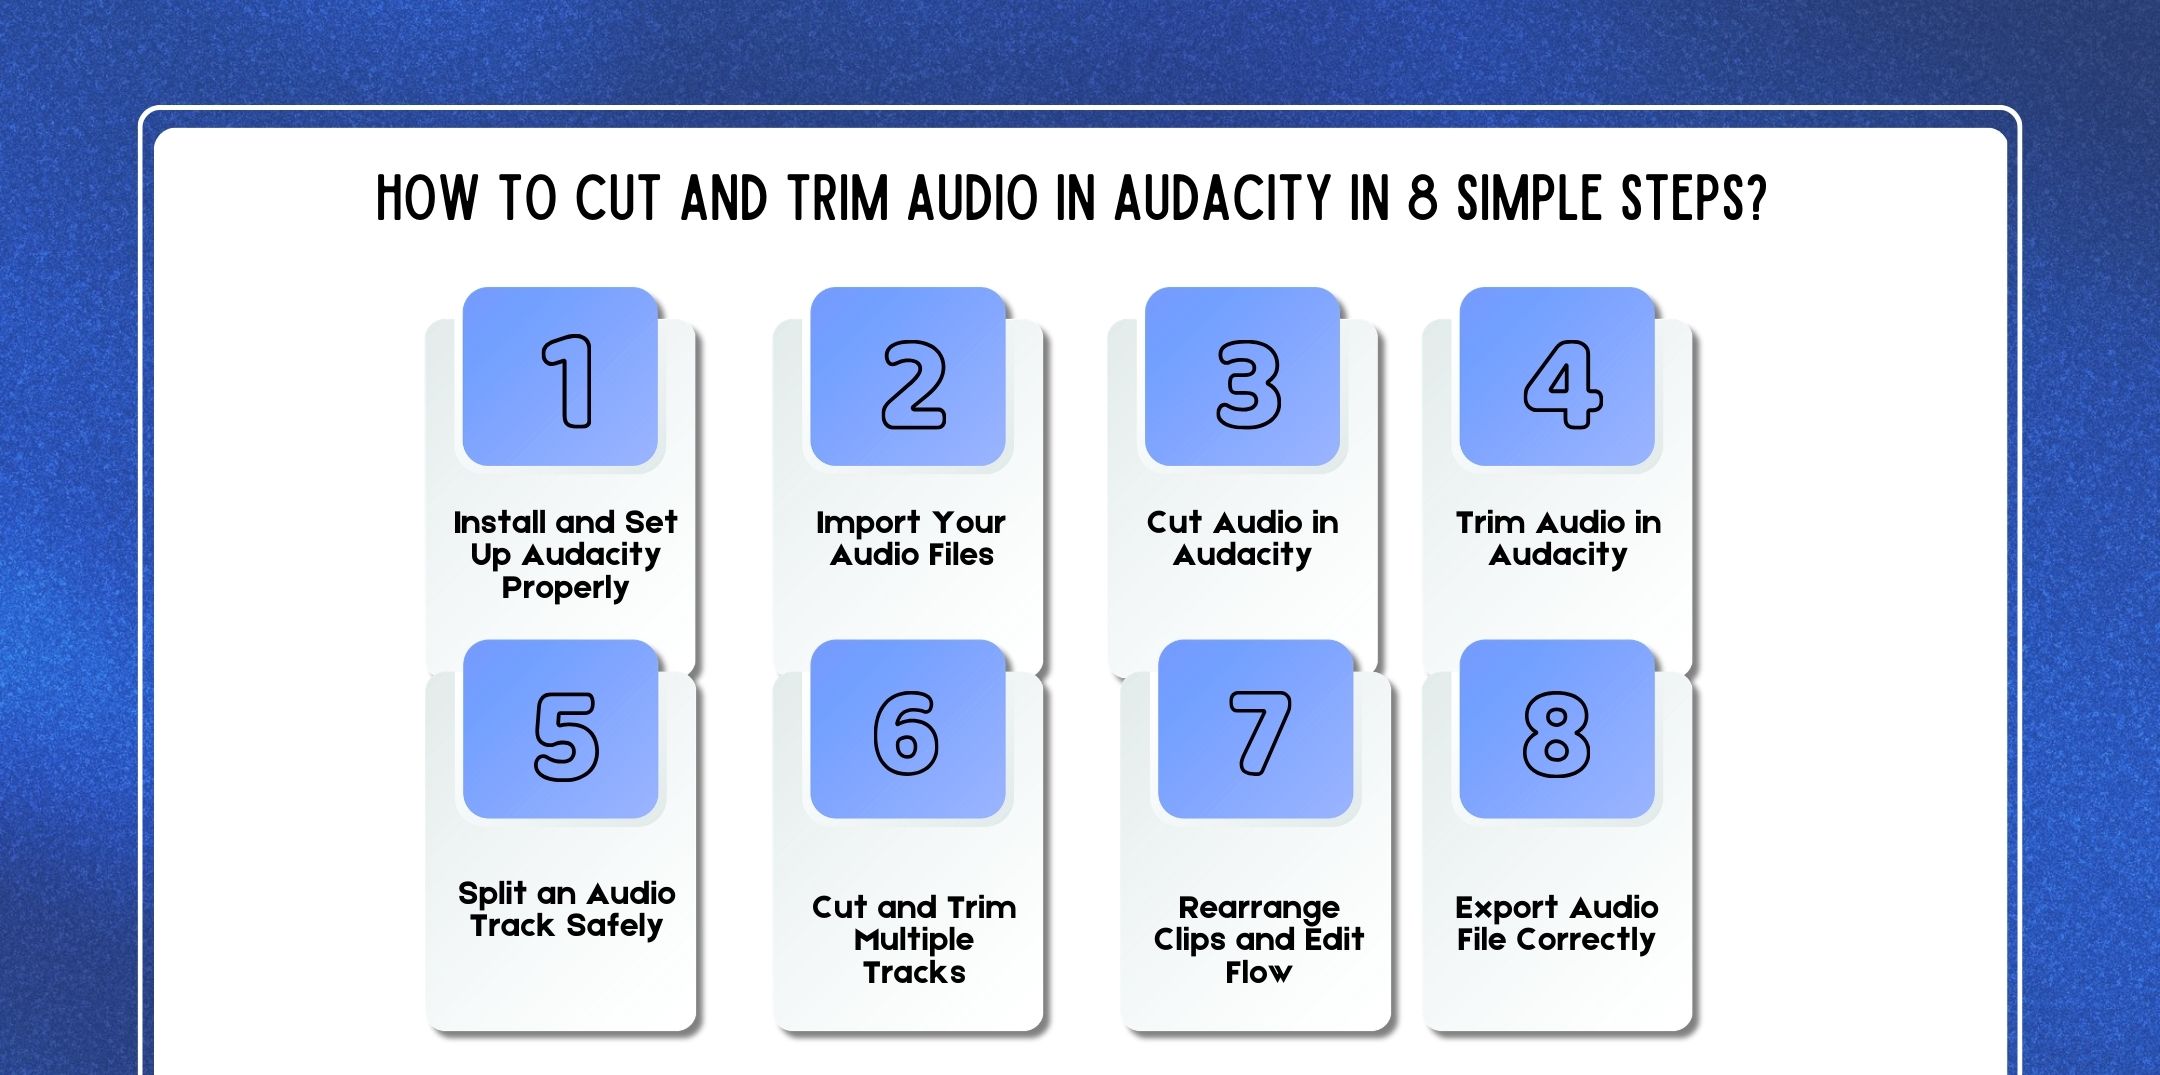
Here is a step-by-step guide on how to cut and trim audio in Audacity.
After installing Audacity:
Proper setup ensures smoother editing and avoids quality loss later.
To import:
Audacity supports MP3, WAV, AIFF, and more. Once imported, zoom in and visually inspect the waveform. Learning to “read” waveforms helps identify silence, mistakes, and breaths.
This is the most important step in mastering How to Cut a Track in Audacity.
Always listen before and after cutting to ensure natural transitions.
Trimming is ideal when you want to keep only one portion.
This instantly removes everything else, making it ideal for repurposing content.
Splitting is non-destructive and powerful.
This technique is heavily used in podcast editing workflows.
For multi-track projects:
This is essential for podcasts with background music or multiple speakers.
Use the Time Shift Tool to move clips.
This step allows you to:
This directly affects listener retention and answers the question: how long should a podcast be shorter, tighter edits often perform better.
Exporting is where many beginners struggle.
To export:
This solves the common problem: How to Save an Audacity File as MP3.
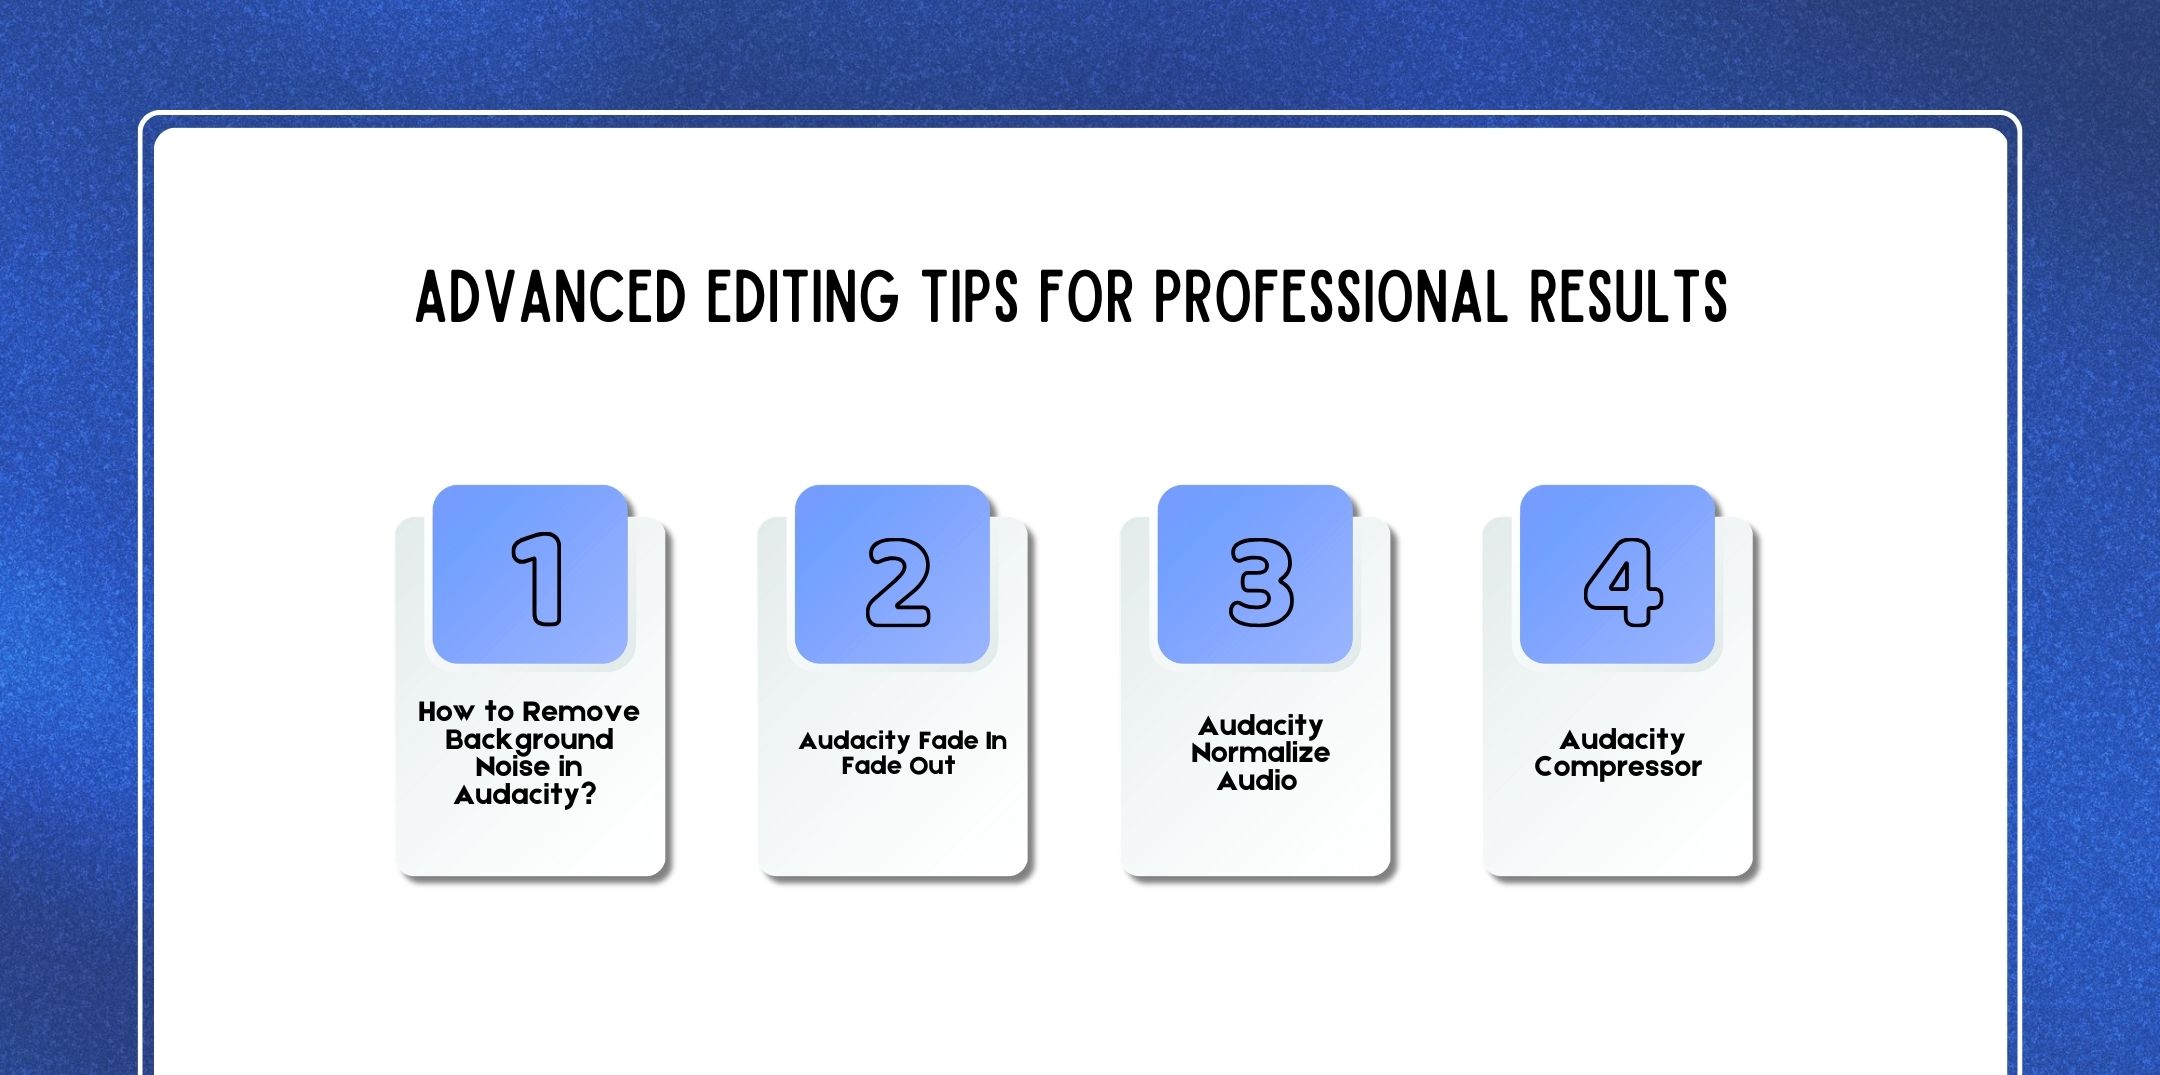
Here are a few advanced editing tips for professional results.
Noise removal should happen before cutting.
Steps:
This prevents noticeable artifacts after cuts.
Use fades to smooth transitions:
This avoids harsh edits.
Normalization Audacity Audio ensures consistent loudness:
Always normalize after cutting.
Compression evens out volume differences:
This improves clarity and professionalism.
Multi-track editing allows:
Lock tracks when needed to avoid accidental edits.

Used by the best podcast editing and production companies:
Audacity’s undo system allows experimentation:
This makes learning safe and forgiving.
Here are a few questions and queries on the topic of Audacity cut track that others have asked, and you might find them helpful at the same time.
Cut and Trim in Audacity function as two distinct tools that beginners often mistake for the same function.
• The Cut function removes all selected audio, which creates an empty space that automatically merges adjacent audio content. The system places the deleted audio into the clipboard, which allows users to paste it at any time. The process helps users remove errors, together with unnecessary words and extended time gaps, and all distracting sounds from the audio track.
• The function of Trim operates in direct opposition to its original function. The system keeps only the selected audio content while it removes all other elements from the audio track. Trim serves as the ideal tool for extracting specific audio segments from extended audio tracks.
Editors need to know when to use Cut and Trim because this knowledge helps them work more efficiently while preventing them from losing essential material.
There are two primary ways to remove silence in Audacity, depending on how much control you want.
• The process of manual silence removal enables you to achieve the highest level of accuracy. The user needs to zoom into the waveform and find the low or flat parts that show silence. The selected parts can be deleted through the user interface. The approach works best for podcasts and interviews, which require preservation of their actual timing.
• The automated tool Truncate Silence exists as an Effect under the menu path Effect → Truncate Silence. The system automatically shortens or deletes sections that have audio below a specific volume threshold. The method provides faster results, but the user needs to establish correct settings, which will prevent the system from cutting off quiet speech and natural pauses.
Editors who work professionally see better outcomes when they use a combination of both available editing techniques.
Keyboard shortcuts significantly improve editing speed and efficiency in Audacity. Some of the most useful shortcuts include:
• Ctrl + X – Cut selected audio and close the gap
• Ctrl + K – Cut audio but leave silence in its place
• Ctrl + Z – Undo your last action
• Ctrl + I – Split audio at the cursor position
• Ctrl + B – Create a label for marking edit points
Learning these shortcuts reduces reliance on menus and helps maintain editing flow, especially during long projects.
To split audio without deleting anything, use the Split function rather than Cut.
When you split a track, Audacity simply divides the audio into separate clips at the cursor position or selection boundaries.
No audio is removed, and nothing is sent to the clipboard. This allows you to move, rearrange, or edit sections independently while keeping all original content intact.
Split is ideal for reorganizing conversations, rearranging sections of a podcast, or isolating problem areas before editing.
Yes, Audacity allows you to cut audio across multiple tracks simultaneously, which is especially useful for podcasts with background music, layered audio, or multiple speakers.
To do this:
• Firstly, select audio across tracks using the track control panels or by holding Shift
• Secondly, ensure tracks are aligned properly
• Finally, apply the Cut or Trim command
This ensures timing stays consistent across all tracks and prevents audio drift.
A cut may leave a gap if you accidentally use Split Cut or Cut and Leave Gap instead of the standard Cut command.
Split Cut removes the selected audio but leaves an empty space where the audio used to be. This can be useful in certain music-editing scenarios, but it often confuses beginners who expect the surrounding audio to close automatically.
If you notice unexpected silence after cutting, check which cut function you used and switch to standard Cut for seamless edits.
Audacity has a powerful undo system that allows you to reverse mistakes instantly.
Simply press Ctrl + Z to undo your last action. You can press it multiple times to step backward through your editing history. Audacity keeps a detailed undo stack until you close the project.
This makes it safe to experiment while learning, as no edit is truly permanent during an active session.
To export a specific portion of audio:
• Select the exact region you want to export
• Go to File → Export → Export Selected Audio
• Choose your desired format (such as MP3 or WAV)
This is particularly useful for creating short clips, highlights, or promotional snippets without exporting the entire project.
Clicks and pops usually occur when cuts are made away from zero-crossings, which are points where the waveform crosses the center line.
When audio is cut mid-waveform, the sudden change can create an audible click. To avoid this:
• Firstly, zoom in closely before cutting
• Secondly, enable zero-crossing snapping
• Finally, use short fade-ins and fade-outs at cut points
These small steps significantly improve audio smoothness.
No, Audacity does not permanently delete audio immediately after trimming or cutting.
As long as the project remains open, you can undo trims and recover removed audio using the undo command.
However, once you save, export, and close the project, trimmed audio cannot be recovered.
For safety, it’s recommended to:
• Firstly, save project versions
• Secondly, duplicate tracks before major edits
• Finally, export backups
This ensures you always have access to the original audio if needed.
The process of track cutting in Audacity serves as the basic skill that enables all audio editing work.
The process of sound removal includes three tasks that develop the content and boost its clarity while producing an attractive listening experience.
The guide introduces you to essential abilities that professionals use for their work, so you need neither costly software nor editing agencies for your needs.
Audacity demonstrates that effective software solutions can maintain their operational power while staying user-friendly.
Anyone can achieve professional audio results through dedication to practice and application of correct methods.

Nabamita Sinha loves to write about lifestyle and pop-culture. In her free time, she loves to watch movies and TV series and experiment with food. Her favorite niche topics are fashion, lifestyle, travel, and gossip content. Her style of writing is creative and quirky.