
How to Get More Followers on TikTok: Proven Strategies for Sustainable Growth
Barsha Bhattacharya, 1 day ago

Learning how to move audio in Audacity is one of the most fundamental skills for anyone editing podcasts, voice-overs, interviews, music, or sound effects.
Whether you’re rearranging podcast segments, aligning voice with background music, or cleaning up interviews.
In addition, Audacity gives you multiple ways to move, split, and organize audio clips efficiently.
Audacity is widely used by beginners and professionals alike, including many creators who later collaborate with the best podcast editing and production companies.
While mastering audio movement not only speeds up your workflow but also improves overall audio quality.
However, something that directly affects listener retention, monetization potential, and insights seen in Apple Podcast analytics.
In this detailed guide, you’ll learn every practical way to move audio in Audacity, along with real-world podcasting tips, shortcuts, and best practices.
Moving audio clips isn’t just about rearranging content; it’s about storytelling, pacing, and professionalism.
Proper clip movement helps you:
Therefore, clean editing also plays a role in long-term growth and earnings, which is why audio quality often influences how much do podcasters make.
The most common way to move audio in Audacity is horizontally left or right along the timeline.
This allows you to:
Horizontal movement is essential before applying effects like Audacity Compressor or Audacity Normalize Audio, as the structure should be finalized first.
Audacity also lets you move clips vertically between tracks.
This method is commonly used in professional podcast workflows and by the best podcast editing and production companies.
Sometimes you need to insert new audio without overwriting existing content.
Creating space is essential when inserting:
This is especially important when preparing episodes for Pandora podcast submission or hosting them on a professional podcast website.
Splitting audio lets you move smaller sections independently.
Once split, each section becomes its own clip that can be moved freely.
Audacity 3.1+ introduced clip handles, making clip movement more intuitive.
Clip handles appear at the top corners of a clip and allow you to:
Clip handles are especially useful when combined with effects like compression and normalization.
On this occasion, speed matters when editing long podcast episodes.
Hence, efficient editing saves time and allows creators to focus on growth, analytics, and monetization strategies tracked through Apple Podcast analytics.
A professional workflow often looks like this:
This process ensures high-quality audio suitable for advertisers and distribution platforms.
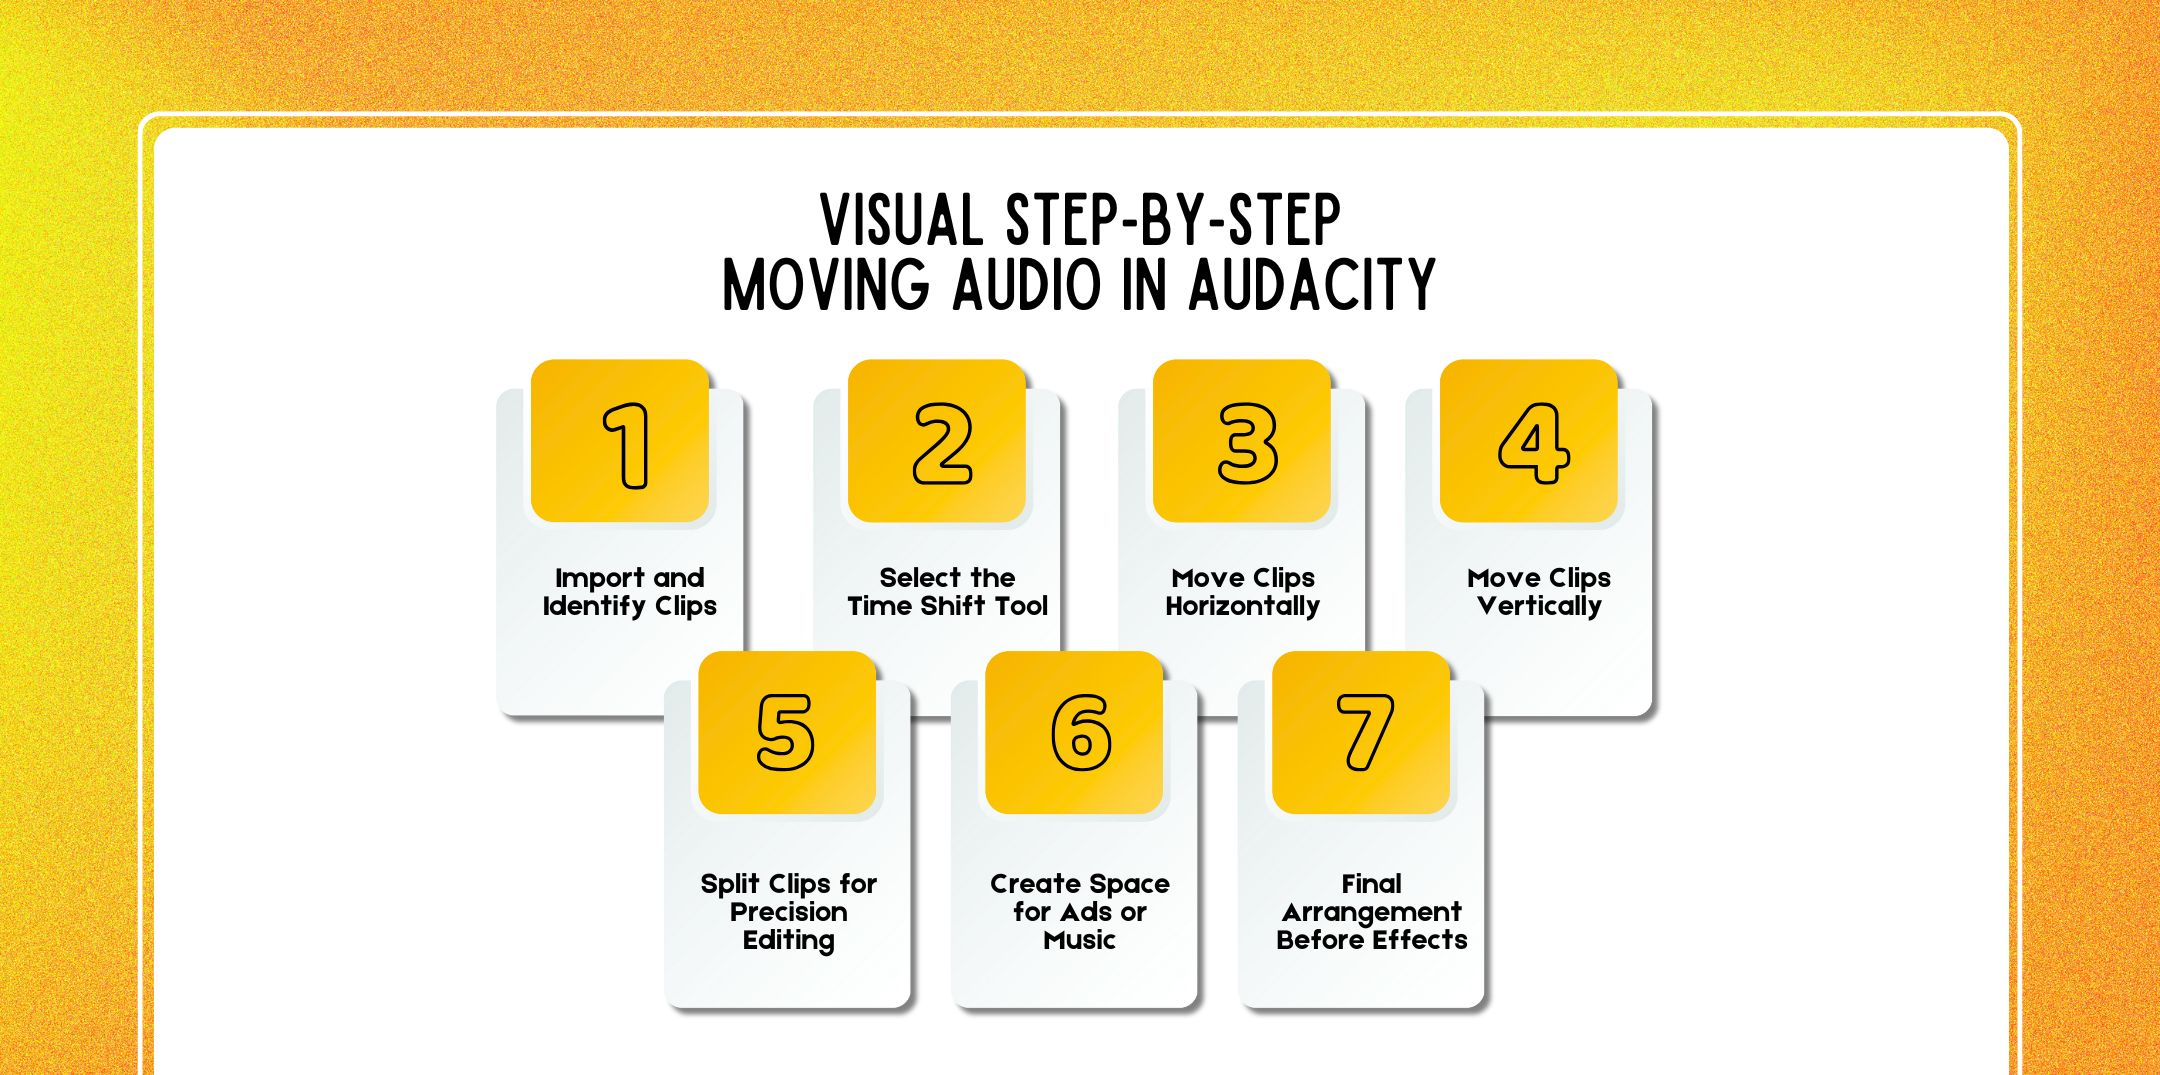
Below is a visual-style, text-based walkthrough to help you clearly see what’s happening as you move audio in Audacity, even without screenshots.
[ Intro Music ][ Host Voice ][ Guest Answer ][ Outro Music ]
While each bracket represents an audio clip on the timeline.
Toolbox → [ ↔ Time Shift Tool ] ← click this
Although this tool allows both horizontal and vertical movement.
Before:
[ Intro ][ Host ][ Guest ][ Outro ]
After dragging the Guest clip:
[ Intro ][ Host ][ ][ Guest ][ Outro ]
So, you’ve now created space or reordered content.
Track 1: [ Host Voice ][ Host Voice ]
Track 2: [ Guest Voice ]
Drag the guest clip upward or downward:
Track 1: [ Host Voice ][ Guest Voice ]
Track 2: [ ]
Meanwhile, this is useful for isolating speakers before applying to the Audacity compressor or EQ.
Before:
[ Host long response ]
Split at cursor:
[ Host part 1 ][ Host part 2 ]
However, now each section can be moved independently.
[ Host ][ Guest ][ Outro ]
Insert Silence:
[ Host ][ Guest ][ Ad Slot ][ Outro ]
However, it is essential for monetization and podcast apps for advertising.
[ Intro ][ Host ][ Guest ][ Ad ][ Outro ]
Only after this step should you apply Audacity normalize audio or compression.
Here are a few questions and queries on the topic of moving audio to Audacity that others have asked that might help you out as well.
While this usually happens when the track is locked or you are clicking outside the clip. Despite unlocking the track and clicking directly on the waveform.
Yes. Hold Ctrl (Windows) or Cmd (Mac) while dragging to disable snap-to behavior for precise placement.
If professionals separate speakers into tracks, color-code clips, move everything first, then at last apply effects. Instead, this workflow is standard among best podcast editing and production companies.
Certainly, you can, but it’s not recommended. Always move and finalize structure before using audacity compressor or audacity normalize audio.
In the meantime, hold Shift and select multiple clips, then drag them as a group using the Time Shift Tool as well.
While overlaps occur when clips are dragged on top of each other. Then zoom in and realign clips carefully.
No. While moving audio does not alter sound quality unless effects are applied afterward.
Create space using silence, move clips, then crossfade if needed. This improves listener retention and monetization potential key to how much do podcasters make.
Yes. As a matter of fact, clean pacing improves listener retention, which positively affects Apple Podcast analytics.
Yes. Basically, the same principles apply when syncing audio with video timelines.
Yes. As can be seen, this allows independent movement and processing for professional results.
Absolutely. Albeit many creators rely on Audacity long-term before outsourcing to best podcast editing and production companies.
Accordingly, platforms reviewing content during Pandora podcast submission favor polished, well-edited audio.
So, to further improve your audio editing skills, explore:
In conclusion, mastering how to move audio in Audacity is a core editing skill that unlocks faster workflows, cleaner edits, and more professional results.
Whether you’re producing a hobby podcast or building a monetized brand, efficient audio movement lays out the foundation for high-quality content that listeners and advertisers trust.

Nabamita Sinha loves to write about lifestyle and pop-culture. In her free time, she loves to watch movies and TV series and experiment with food. Her favorite niche topics are fashion, lifestyle, travel, and gossip content. Her style of writing is creative and quirky.

Barsha Bhattacharya, 1 day ago

Barsha Bhattacharya, 1 day ago