
How The Facebook Algorithm Works: The Four-Step Ranking Process
Barsha Bhattacharya, 3 days ago
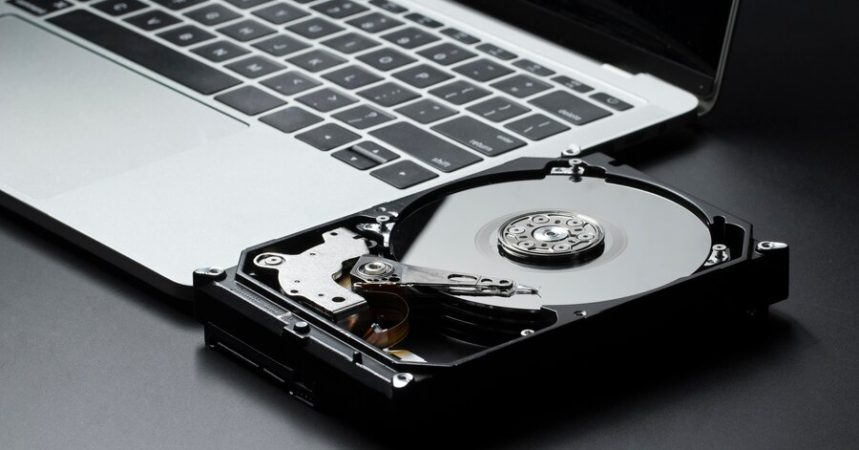
Ordinarily, while connecting your Mac with any hard drive externally, it must either become visible on your Mac Desktop or show up in sidebars like the Finder. But, there are instances when your Mac fails to acknowledge the connected external hard drive, even if you’re using the latest macOS versions like Sonoma or Ventura.
Recognition issues with an external drive on a Mac can stem from a variety of factors, such as corruption, faulty connections, incompatible formats, outdated hardware or software, USB cable complications, port malfunctions, adapter problems, and file system damage.
In this article, we’ll present some quick fixes to tackle the issue of an external hard drive not appearing or being recognized on a Mac, and these solutions are tailored to specific scenarios.
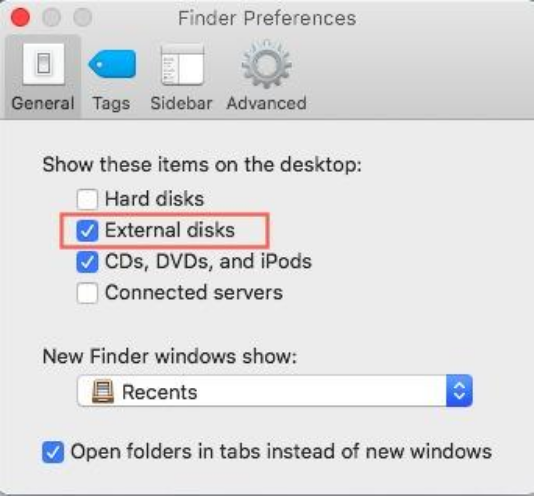
If you connect an external drive to your Mac and it doesn’t show up, the issue might be related to your Finder settings. You can make adjustments to your Finder preferences to resolve the problem of the external hard drive is not showing up.
Open Finder, go to Preferences and click on the General tab. Make sure to select the “External disks” option to have hard drives displayed on your personal computer.
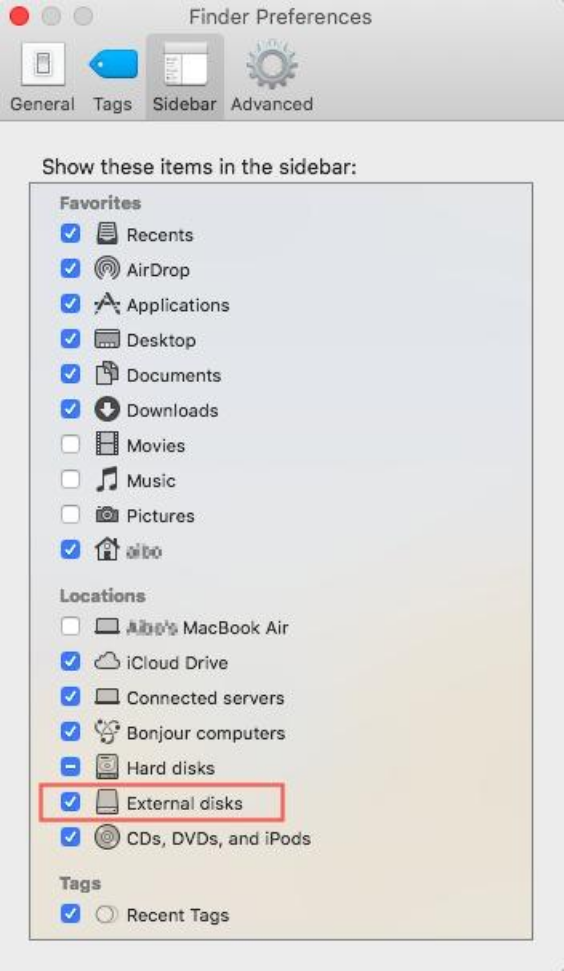
While checking Finder Preferences, navigate to the Sidebar section and ensure to check the “External disks” under the column of “Locations.” This ensures the visibility of your external drive within a Finder window.
Check your Desktop or Finder again to see if the extrinsic hard drive is now visible. If it’s still not showing up, you can attempt to download as well as install iBoysoft Data Recovery on your Mac. Inspect if your hard drive is present within your data recovery software or tool.
If the data recovery tool detects your external hard drive, adhere to the provided instructions to get all your data back. Once the data recovery process is complete, you might be able to continue with the format of the external drive.
If the external hard drive still doesn’t appear in our recovery ecosystem, it may be suggested to get assistance from an expert for later evaluation, especially if you’ve exhausted all other potential solutions.
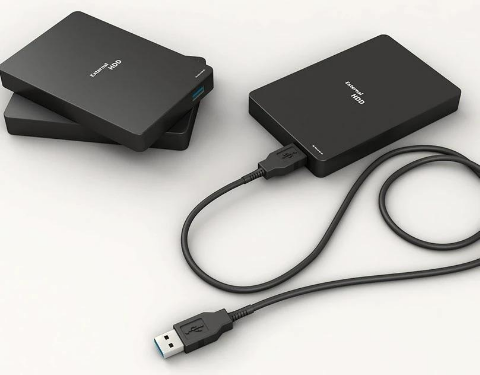
Hard drives, such as Seagate, B Western Digital (WD), LaCie, Samsung, Toshiba, SanDisk, Buffalo, G-Technology, Transcend, and Adata, connect to your Mac through USB cables and ports. When these connections fail, your external drive won’t be recognized by macOS, whether it’s Sonoma, Ventura, Monterey, or any other OS. Here’s what you can do if you can’t find your hard drive externally on Mac:
Once your Mac starts in Safe Modes, attempt to connect your extrinsic hard drive again. If it works in this mode, restart your Mac normally and uninstall any malicious programs you’ve recently added, as they could be the root cause of the problem.
Related: MAC VIRUSES ARE ALIVE KILL THEM AND DWELL IN TRANQUILITY!
If your extrinsic hard drive isn’t showing up in the Finder window on your Mac, you can make sure it’s recognized correctly by using Disk Utility. Disk Utility is a tool that displays all external and internal hard drives examined by macOS, including the macro and minor problems. Here’s what you can do:
Step 1. In the Finder, choose Go > Utilities, then double-click the Disk Utility icon.
Step 2. In Disk Utility, you will encounter one of two common situations:
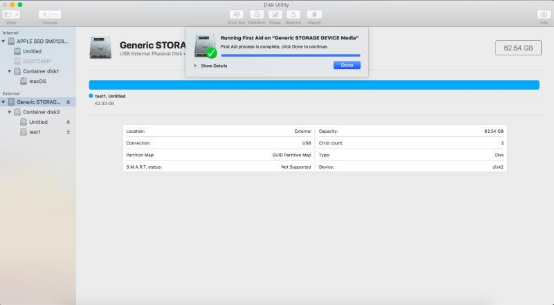
By checking Disk Utility, you can gain a better understanding of your hard drive’s status within macOS and take the necessary actions to resolve any issues. If your Mac detects your external drive in the list of Disk Utility, it means the device has been recognized. If you encounter difficulties accessing it, follow the given steps:
While your Mac should automatically mount the extrinsic hard drive upon connection, if it fails to do so, you can automatically initiate the mounting process in Disk Utility
Once successfully mounted, access the drive through Finder. If you only view the manufacturer’s name (like WD or Seagate) in Disk Utility, this may indicate a damaged partition table. For such cases, consider running Disk Utility’s First Aid to check and fix repairs.
If the external hard drive refuses to mount, it might be afflicted with corruption or directory structure complexities.
If macOS is unable to recognize First Aid or the drive fails to resolve the issue, it could be suffering from severe corruption problems. You might encounter some error messages like: “File system check exit code is 8”, “Invalid FSroot tree,” or “Invalid APFS object map.”
Here, in these instances, reformatting is imperative to establish an overall new file system. Keep in mind that reformatting will erase all current data, so be sure to back up critical data beforehand.
If the external hard drive employs an incompatible file system (e.g., Linux EXT4 or EXT3), you should reformat it for Mac compatibility. You might consider optimizing iBoysoft Data Recovery for Mac in order to get your data back. Then proceed with the following steps to reformat the altered external drive:

Related: HOW TO RECOVER DELETED OR UNSAVED WORD DOCUMENTS ON WINDOWS 10?
When your external hard drive doesn’t make an appearance in Mac Disk Utility, there are various approaches you can try to resolve the issue. These methods encompass halting a process known as “fsck” in Activity Monitor, resetting specific settings on your Mac, updating your Mac’s software, and employing Mac diagnostic tools.
If your hard drive fails to show up in Disk Utility, adhere to these steps for troubleshooting:
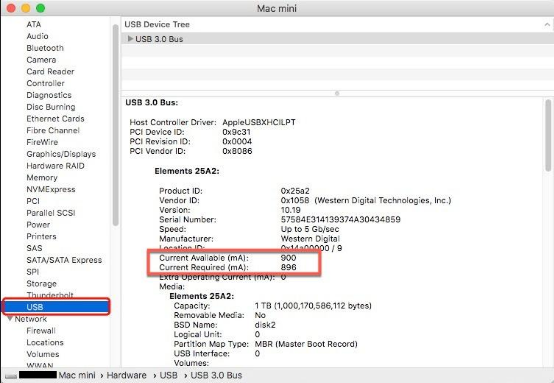
Step 1. First, verify whether your Mac has recognized the hardware information of the external drive.
Step 2. Navigate to Applications > move on to Utilities > then System Information > and finally to USB. Examine the information on your hard drives within this section.
Step 3. If you find the external drive listed in System Information. However, refrain from getting into Disk Utility, as it may be undergoing macOS repair. To resolve this situation, try the following steps:
Nonetheless, if the extrinsic drive continues to remain unseen within Mac’s Disk Utility, it could be due to underlying hardware issues. You can address these concerns by employing the following remedies:
NVRAM functions to preserve specific configurations even while powering down your computer. If you’re encountering problems linked to these stored configurations, resetting the NVRAM may assist your Mac in recognizing the external drive.
Power off or restart your device and promptly press the following four keys in sequence: Command + Option + P + R.
Keep these keys depressed for a minimum of 20 seconds. Once you listen to the second sound, release it.
After relinquishing the keys, your Mac is going to initiate a restart, and with any luck, your external drive will reappear.
In specific situations, resetting the SMC or System Management Controller can alleviate issues since it oversees lower-level activities. Examples are hardware and power. (Please note that the SMC reset process varies depending on your Mac model, so ensure you’re aware of the steps applicable to your particular device.)
As an illustration, let’s consider resetting the SMC on a MacBook Pro Retina, MacBook Pro, or MacBook Air equipped with an internal non-removable battery:
Step 1. Turn off your MacBook Pro/ Air, and then establish a connection with its power adapter.
Step 2. Once you turn off the power of your Mac, tap Shift + Control along with Option on the corner side of the integrated keyboard simultaneously. Then press the power button. Keep the power button and keys depressed for 10 continuous seconds.
Step 3. Simultaneously, release both of them at the same time. Subsequently, again tap the power button and switch on your Mac. Here, it might require a brief moment.
If your Mac is currently operating on macOS 10.12 or an earlier version and your external hard drive is formatted with APFS (Apple File System), there’s a chance that your Mac won’t be able to recognize the drive. To resolve this situation and ensure compatibility with the latest file systems and USB devices, it is advisable to update your macOS. To initiate the update process on your Mac, follow the given steps:
Step 1. Right-click on the Apple logo located in the top right corner and select “System Preferences.”
Step 2. Locate and open “Software Update” to check for available macOS updates.
Step 3. Prior to proceeding with the software update, be sure to back up your crucial files.
Apple Diagnostics comprises a set of diagnostic tools used by technicians to detect hardware faults in Mac devices. It can be employed to rule out or confirm suspicions related to your external hard drive. Prior to running Apple Diagnostics, disconnect all external devices except for the keyboard, mouse, and other essential peripherals. If your external the hard drive has suffered physical damage, so it’s advisable to consult a local center for disk repair. Here are the steps to follow:
Apple Diagnostics encompasses a suite of diagnostic tools utilized by technicians to pinpoint hardware issues in Mac devices. It can be utilized to confirm or dismiss concerns related to your extrinsic hard drive. Before running Apple Diagnostics, it’s essential to detach all external devices except for the keyboard, mouse, and other essential peripherals. In case your hard drive has experienced physical damage, it is suggested to get assistance from a local disk repair shop. Here are the steps to follow:
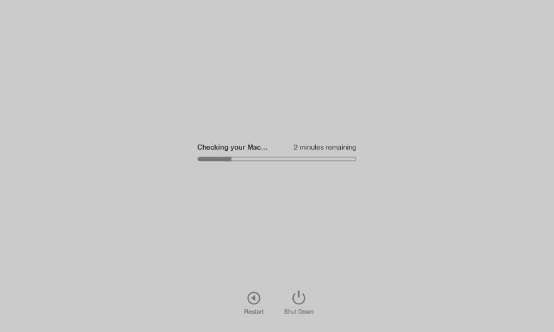
Restart your device or turn it on if it’s off. Tap and hold the ‘D’ key on your keyboard till the time you get to choose your preferred language.
Once you’ve chosen your language, you’ll observe a progress tab or bar displaying “Checking your Mac.” This signifies that it’s running an assessment referred to as Apple Diagnostics to detect any potential issues with your Mac.
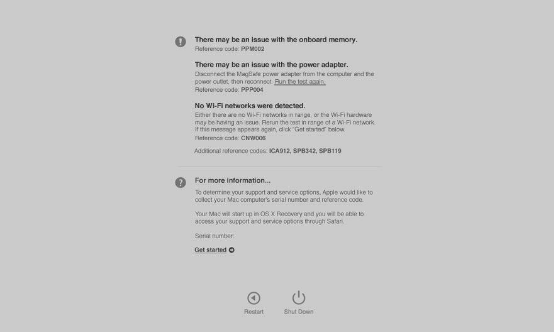
Upon completion of the test, it will provide recommendations on how to address any identified problems.
In summary, troubleshooting the issue of an external hard drive not being recognized by macOS can be intricate. If you’re concerned about potential data loss, it’s advisable to utilize a tool such as iBoysoft Data Recovery for your Mac devices to retrieve important files before attempting any fixes.
To mitigate such problems in the future, always ensure that you eject external drives properly and maintain a regular backup routine for critical files, whether to another drive or cloud storage. This proactive approach can help reduce the need for recovery procedures altogether.
Read Also –

Abdul Aziz Mondol is a professional blogger who is having a colossal interest in writing blogs and other jones of calligraphies. In terms of his professional commitments, he loves to share content related to business, finance, technology, and the gaming niche.